Basic Sewing and Clothing Repairs for UK Students: Save Money on Fixes
Published on Mar 30
0 Comments
Why Mending Your Wardrobe Matters Now
Clothing repairs are often the first skill university students neglect. Between lectures, assignments, and part-time shifts, spending an hour learning to sew feels impossible. But consider this: fast fashion prices have climbed steadily since 2023, making replacement less viable than ever. A simple button stitch takes five minutes. If you pay a tailor in London or Manchester, that same job costs around £15 to £20 including travel. By learning basic sewing repairs, you reclaim control over your wardrobe and your wallet.
This isn't just about nostalgia. It is about survival during budget months. When you break a hem before moving back home, panic sets in. Knowing how to handle it prevents the stress of walking to classes in trousers that drag on the floor. We will cover the essentials needed to keep your clothes wearable throughout your degree.
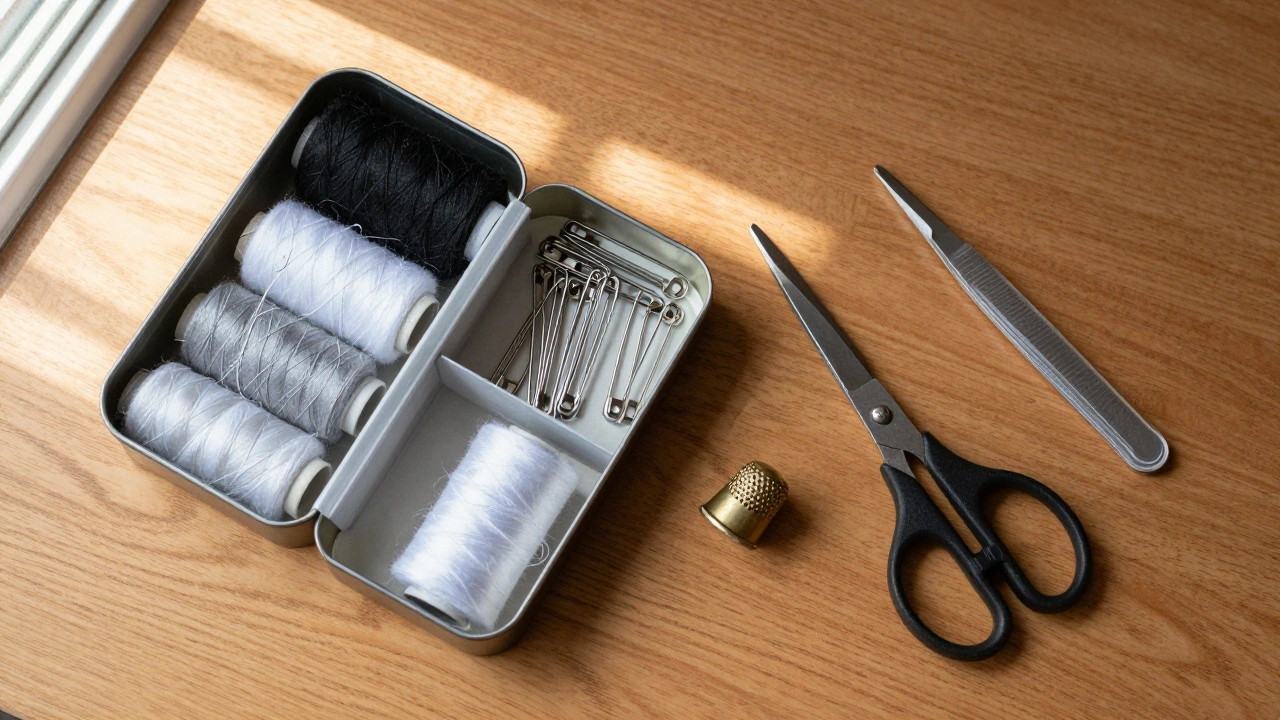
The Minimalist Starter Kit for UK Dorms
You do not need a machine yet. A small Sewing kit tucked in your desk drawer solves 90% of emergency problems. You can grab one at any high street pharmacy like Boots or supermarket chain like Tesco Express. Look for a tin box that keeps needles safe from your books.
Here is exactly what belongs inside:
General purpose needles: Size 8 or 9 works for shirts and jeans.
Polyester thread: Black, white, and grey match most casual wear.
Fabric scissors: Do not cut paper with these, they dull instantly.
Small thimble: Protects your finger when pushing through thick denim.
Safety pins: Useful for temporary hems or holding fabric before stitching.
Tweezers: Essential for removing stuck lint or bobbles from sweaters.
Total cost usually hovers near £8. This is cheaper than one single new pair of socks. Keeping the kit organized means you won't waste time searching when disaster strikes mid-term.
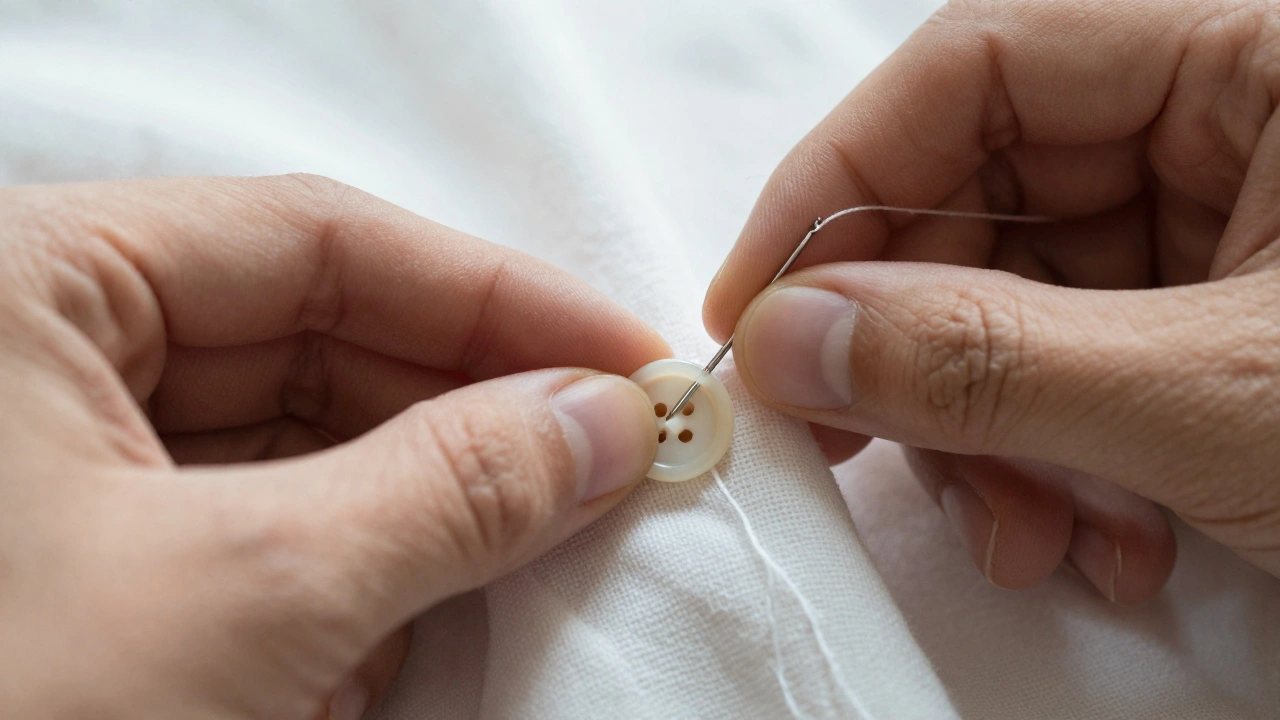
Fixing a Lost Button Without Panic
A missing button ruins the look of a shirt instantly. Most students wait until they find the original button, which might take days. In reality, replacing it is quick if you have a spare pack.
Locate the hole: Identify where the old thread broke. Sometimes the fabric wears thin there. If it looks weak, reinforce the area with a patch first.
Thread the needle: Cut a length of thread about arm's length. Longer threads tangle.
Create a shank: Place the button face down. Bring the needle through the fabric to the front, then under the buttonhole. Don't pull tight yet.
Secure the shank: Twist the thread between the fabric and the button four times. This creates a stem so the button isn't glued flat, allowing room for the next layer of clothes.
Lock it off: Pass the needle under the twisted threads to the back and tie a secure knot.
If you lost the button entirely, check the bottom of your drawers. Many people keep "orphaned" buttons from old shirts. Alternatively, buy a generic set online. Matching the exact style matters less than matching the size and material type.
Darning Socks and Holes in Jumpers
Holes in cashmere jumpers or wool socks are the classic winter problem. Instead of binning them, darning fills the gap. It requires a bit more focus than a button fix.
Tools needed for darning socks
Item
Purpose
Darning Mushroom
Stretches the sock shape to keep it flat
Matching Yarn
Should feel similar to the original wool
Blunt Tapestry Needle
Prevents snagging surrounding fibres
Place the mushroom underneath the hole. Weave the yarn back and forth across the gap vertically first. Then weave horizontally through those lines. Pull it tight as you go. The goal is to make the new fabric sit flush with the old. Once done, trim loose ends and wash gently. This extends the life of knitwear by another season easily.
Hemming Trousers Quickly
Buying second-hand clothes from thrift shops often results in pants that are too long. Taking them to a professional costs money. Doing it yourself saves about £30 per pair.
Turn the trousers inside out. Walk normally to mark where the hem falls. Fold the excess fabric up and press it flat with your fingers. If you have an iron, a light touch helps set the crease. For a temporary fix, use safety pins to hold the fold together while you walk around. For a permanent version, use a slip-stitch.
Insert the needle into the fold edge, grabbing just one or two threads of the main pant leg. Keep the stitches almost invisible on the right side of the garment. This method allows the fabric to move naturally without bunching. It takes patience but yields a result indistinguishable from store-bought finishes.
When Zippers Fail
Zippers jamming is frustrating, especially in cold weather jackets. Before tossing the coat, try these tricks:
Lubrication: Rub the teeth with a bar of soap or graphite pencil. This reduces friction.
Realignment: If the slider popped off, align the top stops of both zipper sides carefully. Slide the mechanism back on slowly.
Missing pull tab: Loop a split ring or small keyring onto the top of the slider. It serves as a makeshift handle.
If the fabric tearing along the track has occurred, sewing over the base might work temporarily. However, replacing the whole zipper requires advanced skills. Know when to stop trying DIY methods and bring it to a campus repair service instead.
Professional Help vs DIY Costs
Understanding the value of your time is crucial. Some repairs are worth paying for.
Cost comparison for common fixes
Repair Type
DIY Cost
Tailor Cost
Button Replacement
£0.50
£12.00
Simple Hem
£0.00
£20.00
Zipper Replace
£15.00
£25.00
Darning
£1.00
£30.00+
Use a tailor for complex structural changes like shortening suit sleeves or resizing waistbands. These require industrial machines. Use your skills for everyday maintenance. Universities sometimes offer discounts on services, so ask student unions about partnerships with local dry cleaners.
Maintenance Habits That Reduce Repairs
Prevention is always easier than cure. Washing habits play a huge role in longevity. Turn garments inside out before washing. This protects printed logos and delicate fabrics from the agitation. Use mesh bags for small items to prevent them tangling with heavier loads.
Hang clothes to dry whenever possible. Machine drying shrinks natural fibres like cotton and wool faster. Air drying is free and gentler. Check pockets before throwing clothes in the wash. Keys or coins left behind damage the washing drum and scratch the fabric.
Store seasonal clothes properly. Folding sweaters rather than hanging them prevents shoulder stretching. Using cedar blocks in wardrobes repels moths naturally, saving you from expensive pest treatment later.
Resources for Advanced Learners
Once you master the basics, you might enjoy more advanced tasks. YouTube offers excellent visual guides. Search for channels focused on sustainable fashion repair. Local community centres in cities like Leeds or Birmingham often run weekend crafting workshops. These provide equipment access without the pressure of owning a full setup immediately.
Joining a student society dedicated to craft or sustainability connects you with peers who share tips. You can swap threads, needles, or even trade skills. Learning in groups makes the process social and less isolating.